
Those of you who do project management with Merlin on your Mac and have checked our post series explaining how to create custom templates for Merlin reports, know by now…
- How to modify existing reports
- How to edit description or report template names
- How to create your own report templates
- How to localize a Merlin report template
- Further tips for localizing an xslt report template
- How to add an option in an xslt report template
- How to add an option in a python / wbl report template
- How to add a property into an existing xslt report
- How to add a property into an existing python /wbl report template
Now let’s do some magic with the reports.
- Map a status or flag information to a graphic file
- Define the size of the project image over the options
- List overdue tasks along with the next activities, in “Next Due Activities” report
- Report planned, actual and planned vs actual work per phase in a chart
- Report expected work costs per role for your resources
- Report expected work costs per resources’ group
- Report the project’s name in the Next Due Activities report
- Modify the “Milestone Trend Report” to show the WBS in the table and in the chart
- Report expected or actual resources’ work per phase
- Report resources work cost per phase
- Report cash flow for expected cost or approved budget
- Report billable costs entered on elements
- Report element costs by type
- Report issues
- Report Events
- Output Project’s WBS
- Resources Time allocation to various tasks and subtasks
- Calendar View
- Working hours distributed in time per resource and assignment
- Work Chart
- Information report with hierarchy
- Complete vs Expected Complete % Analysis
- Resource Groups’ or Roles’ Units Utilization Distribution
- URLs report
- Resources Groups’ or Roles’ Work as distribution in time
- Cost report: Planned, Expected, Actual, Remaining actual cost
- Format dates in ‘Information report’, ‘Next Due Activities’ and ‘Review Report’ as dd/mm/yyy
Format dates in ‘Information report’, ‘Next Due Activities’ and ‘Review Report’ as dd/mm/yyy
Above report templates are XSLT based reports. This technology does not allow them to ask the date format on your Mac, so dates are hard coded as (mm/dd/yyyy) which is correct if you are US based.
If you however want to format dates as dd/mm/yyy you would need to edit all those report.xslt files and modify the dateformatter from “‘[M01]/[D01]/[Y]'” …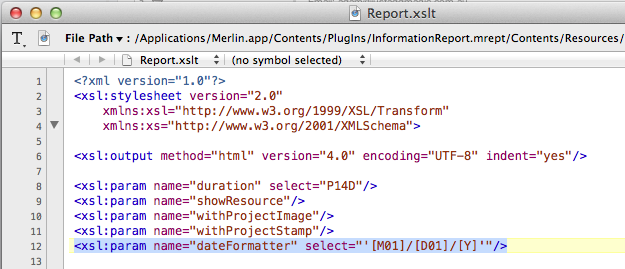
to “‘[D01]/[M01]/[Y]'”.
To make a long story short, we’ve created a new set of those three reports and post it hereafter.